LOM riser card
Removing the LOM riser card
-
Follow the safety guidelines listed in Safety instructions.
-
Follow the procedure listed in Before working inside your system.
-
If installed, remove the risers.
Follow the below steps to remove the LOM riser card:
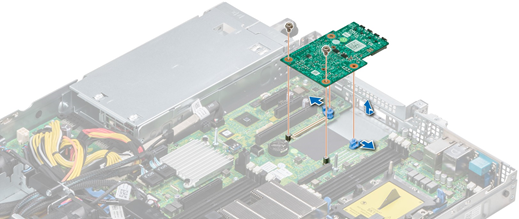
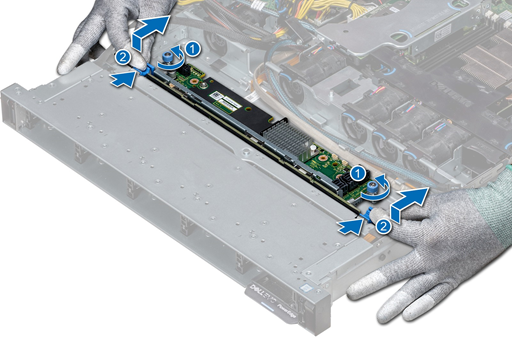
1. Using a Phillips #2 screwdriver, loosen the screws that secure the LOM riser card to the system board.
2. Release the two blue side plastic snaps holding the LOM riser card.
3. Hold the LOM riser card by the edges on either side, and lift to remove it from the connector on the system board.
4. Slide the LOM riser card towards the front of the system until the Ethernet connectors or the Small form-factor pluggable (SFP) are clear of the slot in the back of the system.
After removing the LOM riser card you could do the following:
-
Install the LOM riser card.
Installing the LOM riser card
-
Follow the safety guidelines listed in Safety instructions
Follow the below steps to install the LOM riser card:
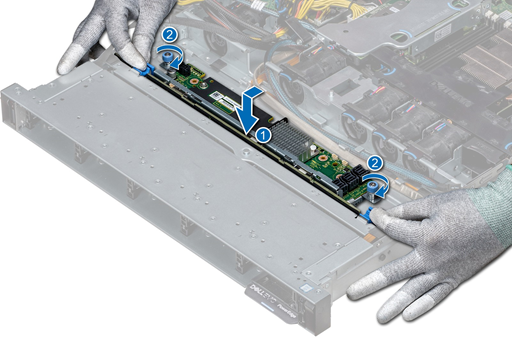
1. Align the connectors on the LOM riser card with the slot on the system.
2. Press the LOM riser card until the card is firmly seated on the system board connector and the two blue plastic snap hold the LOM riser card in place.
3. Using a Phillips #2 screwdriver, replace the screws to secure the LOM riser card to the system board.

After installing the LOM riser card you could do the following:
-
If removed, install the risers.
-
Follow the procedure listed in After working inside your system.
Hard drive backplane
Hard drive backplane details
Depending on your system configuration, the hard drive backplanes supported in hardware appliance are listed here:
|
System |
Supported hard drives options |
|---|---|
|
GigaVUE-FM Hardware Appliance |
2.5-inch (x8) SAS, SATA or Nearline SAS drives |

| Figure 1 | 8 x 2.5-inch backplane |
1.Release tab
2. SATA_A cable connector
3. backplane signal cable connector
4. backplane
5. SATA_B cable connector
6. backplane power cable connector
Installing the hard drive backplane
-
Follow the safety guidelines listed in Safety instructions.
Note: The procedure to install the backplane is similar for all backplane configurations.
Follow the below steps to install the hard drive backplane:
1. Align the slots on the backplane with the hooks on the system.
2. Lower the hard drive backplane until the blue release tabs snap into place.
3. If your backplane has an expander board, then tighten the captive screws to secure the expander board to the system.
After installing the hard drive backplane you could do the following:
-
Connect all the cables to the backplane.
-
Install all the hard drives.
-
Install the backplane cover.
-
Install the air shroud.
-
Follow the procedure listed in After working inside your system
Removing the Hard Drive backplane
CAUTION: To prevent damage to the drives and backplane, remove the hard drives from the system before removing the backplane.
CAUTION: Note the number of each hard drive and temporarily label them before you remove the hard drive so that you can replace them in the same location.
Note: NOTE: The procedure to remove the backplane is similar for all backplane configurations.
-
Follow the safety guidelines listed in Safety instructions.
-
Follow the procedure listed in Before working inside your system.
-
Remove the air shroud.
-
Remove the backplane cover.
-
Remove all hard drives from the hard drive slot.
-
Disconnect all the cables from the backplane.
Follow the below steps to remove the hard drive backplane:
1. Press the blue release tabs and lift the backplane to disengage the backplane from the hooks on the system.
2. To remove a backplane with an expander board:
| a. | Loosen the captive screws that secure the expander board. |
| a. | Press the release tabs and lift the backplane to disengage the slots on the backplane from the hooks on the system. |
3. Lift the backplane out of the system.


